Friday, April 8, 2011

New Tags in the Shop & Watercolor Technique!

New Technique

Well, I finally tried the whole new technique about painting with the distressing inks! However, I started small & only colored in the carrots! I like it though, it's easy and I will be applying this to more projects VERY soon! I am doing this blogpost to show my tags, but I figured I will tell you the process. If you would like a photo tutorial, I would be more than happy to create one for you! Just let me know :) 

What you do is very simple...... 
First let's gather our supplies...

☑1. Small paintbrush (or those fancy li'l waterbrushes! lol)
☑2. Acrylic block
☑3. Distressing inks (Holtz kinds, etc)
☑4. Little bowl/dish of water
☑5. Paper towel or dish towel you can throw in the washer

Simple, right?!

✍✍✍✍✍✍✍✍✍✍✍✍✍✍✍✍✍✍✍✍✍✍✍✍✍✍✍✍✍✍✍✍✍✍✍✍✍✍✍✍✍

Here's the process as follows....

☑1. Take your ink pad and dab it onto your acrylic block, 4 or 5 times should be good to start

☑2. Take your paintbrush, dip it in the water, and tap off the excess OR lightly blot it onto the paper towel. You do want a little bit of water... same as if you were actually painting with real watercolors. 

☑3. Dip it onto the ink that you have waiting on the acrylic block

☑4.. PAINT! :) 

See, pretty simple and it gives it such a nice look! 

Here's the photos of my carrot tags that I've just listed on etsy tonight..... 

                 Yummy CARROT Hang Tags Stamped & Watercolor


Happy Scrappin', Craftin' & Rubberstampin',
Emily

Hope you all have a wonderful weekend!
✍✍✍✍✍✍✍✍✍✍✍✍✍✍✍✍✍✍✍✍✍✍✍✍✍✍✍✍✍✍✍✍✍✍✍✍✍✍✍✍✍✍✍✍✍✍✍✍✍✍✍✍✍✍✍✍✍✍✍✍✍✍✍

Thursday, April 7, 2011

Baby's Birth Premade Layout Shabby And Vintage Inspired Boy or Girl


Yes, I've been very busy! lol. This is my latest layout. These layouts are especially special to me. When they are the single layouts, you really have to pay attention for detail. And for some reason, I always go heavy on the embellishments with the single pages. To me, it's like a little 12 x 12 work of art. 


This layout is absolutely so shabby and so sweetly vintage. I have created this for a 12 x 12 inch scrapbook album. It is a single page and it's very 3 dimensional. 

As you can see in the photo, this for a single photo. I would place a very special photo that I really want to stand out, like a favorite photo of when they were born. I know I have quite a few, so it would be hard :) 

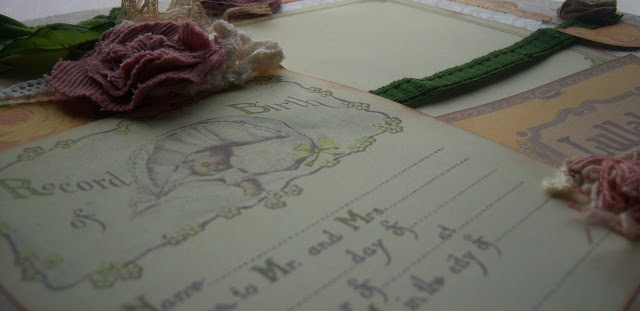
The single photo mat is adorned by handmade fabric flowers and do you see the sweet little chick looking up at the photo mat? It's lifted off the page. There is a gorgeous shade of green vintage ribbon running across the photo mat. Your photo will slide very easily behind the ribbon. Below that reads "lullaby" with the vintage inspired embellishment. There are more fabric rolled flowers and more vintage trim. I have a vintage lace bow at the top and I've curled and distressed the edges to keep up with the vintage shabby feel. 

To the left is the Record of Birth to be filled out. You can fill out......
Name.............
Born to Mr. and Mrs...............
On the.................day of....................
In the year of................ at.......................
o'clock.............in the city of..............
Baby Weighed.......................

All the adornments are handmade. There are corduroy shabby flowers, chenille flowers, Silk leaf, vintage ribbon, vintage trim, Rolled flowers and vintage lace. 


If you have any questions, or would like to know anything, please send me a message. Looking for a tutorial? Leave me a comment with an idea! Thanks again! 


This layout is available for purchase....
http://www.etsy.com/listing/71713366/babys-birth-premade-layout-shabby-and


Happy Scrappin', Craftin' & Rubberstampin'
Emily

REMEMBER Premade Paper Bag Album Vintage


This listing is for a paper bag album. This album measures just about 7 inches by 7 inches. I have handsewn with pink organdy ribbon (over and over) the side binding. On the cover there are fabric flowers, a shabby booch with a victorian feel, rhinestone butterflies and I've added round diamond like rhinestones in all the corners. There are also 4 double sided pull out tags that I had no room for (photos). They are coordinated with this album and have ribbon at the top for easy pull out. 

There are tons of details! I have them written here for etsy, but you can see everything in the photos too! In case you do want to read more http://www.etsy.com/listing/71681286/remember-premade-paper-bag-album-vintage

Happy Scrappin', Craftin' & Rubberstampin'!
Emmy

Wednesday, April 6, 2011

EASY Flower that YOU can Make Tutorial


First you will need your very basic and simple supplies
-Coffee Filter
-Brads
-Scissors
-Ink pad, spray or both
----If you want to make your own spray, you can check out my tutorial here... http://sweetlyscrappedart.blogspot.com/p/diy-ideas.html ----


Then you will cut your coffee filters into circles! NO NEED To be precise! I would just make sure that you cut them different sizes. 


Layer the pieces by size. Smallest on the top as shown in these two pictures. I pushed the brad through the center of the filter. I didn't punch holes first or anything like that. 


Now you can scrunch up your flower. I did mine each layer at a time. I scrunched up the first layer, then the next.... all the way to the bottom


This is my homemade glimmer mist. I've repurposed one of those travel sized body sprays from Calgon. 


Then you will pounce, dab and if you'd like more color, sweeeeeeeeep :) your ink pad onto the flower....


I've done it here..... Then I added a little more.... 


But I wanted alot of POP and color so I've used the glimmer mist too! 


My flower is about 2 inches large because that's the largest that I cut the circle. So we can make like 100 flowers for a BUCK! Go to the dollar store and pick up a package! Line them all up & spray them down! lol. Great to keep on hand for those layouts. I know I personally create a bunch of flowers at a time because it can be very time consuming to stop in the middle of a project to create flowers. Alot of times I will create them in neutral shades & spice them up later as I am working so they will coordinate. 

If you create one I would love to see it! Post it on my wall at http://www.facebook.com/sweetlyscrapped 

Happy Scrappin', Craftin' And Rubberstamping,
Emily 

Please feel free to share! Tweet! Stumble! It's fine. I love sharing tutorials with you all that I come across too! 

Tuesday, April 5, 2011

Home Sweet Home Premade Double Page Layout

ON THE FIRST PAGE there is a border at the top and bottom and I have added two 8 inch doilies to each page. There are two photo mats on this page. Above the first page is a banner style runner and it also starts the title with the letters H O M E and they're lifted off the page. Below the first photo mat are adornments such as handmade flowers painted swirls, a hand pieced embellishment and a flocked silhouette. On the second photo mat, above, is the little bear and see how they're holding the heart? That is also lifted of the page. Your photos will slide under all the embellishments. Below the second photo mat are more flowers and flourishes. 

ON THE SECOND PAGE there are also two more photo mats and also a little pocket with 4 pull out tags. On the first photo mat there are pretty flowers, painted pearl cents, flourishes and two more flocked family inspired silhouettes. Below the first photo mat is a lined journaling card that has been given the hand aging process and next to it is a paper pieced little house. The little pocket is above the second photo mat. Below the second photo mat are more flowers, flourishes and the rest of the title that reads H O M E. 

Happy Craftin, Scrappin & Rubberstampin',
Emily 

Alice in Wonderland Two Page Premade Layout


I Decided to finally do it! I've been wanting to. I think I am going to do another one soon, because I already have a thought on a different way to do this!


Happy Scrappin', Craftin' and Rubberstampin'! 
Emily