Lookie what I did!!! :)
I recently made a trip to a thrift shop (great places to find vintage materials and supplies at a reasonable price) and the one locally supports great causes in our community, some of which even my children benefit from. So I really love going there. Wellllll, in my travels I got some board books. This one used to be a Barney (yes that purple dinosaur, oh god!!! I know!) book with colors :) Well after I brushed up on my colors (haha) I made it into an album. Now with these books, if you notice, the pages can be shiny. That's no good for sticking paper two. You have a few options.
1. Peel some of the pages off
2. Mod Podge it
3. Sand the pages (I do this with my composition notebooks)
I chose option 1. I peeled the pages. Now if you can get the corner of the book up, that's a great start. I then use my cricut spatula took to scrape it off as I went. Kind of helping it lift up. I will be the first one to admit that I can get frustrated with this... I can be a very impatient crafter at times. Especially when I still have items to list on the website to do, custom orders to finish, kids to make sure are doing their homework, a house to clean... I know you guys know what I mean. lol.
This one scraped off nicely. I was happy. I kept this book. lol.

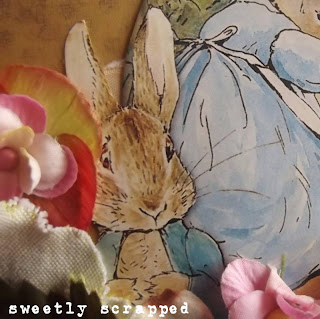
Here's a close up of the flowers on the cover of the album.... I layered them with a brad and then glued them onto the cover. I did these along the base of the book....
I like how Peter Rabbit looks like he's hiding behind them...
See him!?! Too cute :)
here's a side view of the album. I knew it was going to be thick, but didn't realize how thick. So after the album was created, I went back and I added the ribbon wrapped around so it can be tied shut with a bow.
Here's another side view shot....
First set of pages....
2nd set of pages....
3rd set of pages....
4th set of pages...
5th set of pages....
6th set of pages....
7th set of pages....
And now onto the details that made this album special....
I took the one page and layered it onto cardstock a few times,
and it's the part of the book that says "This book belongs to"
Here's an image of Peter eating his carrot....
And another one of him inside the water can!
How about some flowers? A pretty pink grid journal box? Sure! :)
I also added a little satin ribbon...
A mason jar and a silk flower in mint and pink...
I created a butterfly on a sheet music background. I then added one of my "Memories" journal boxes.
A pretty layered silk flower with a pink flower brad in the center...
I then printed a "ABC" Sheet music song and added a padded felt butterfly in red...
I then added one in blue. I used pretty striped twine for an accent on each...
A part of the book (above)
And a lace applique and aged journal box (below)
I really wanted the pages to look like they've been opened and closed 100 times like a real vintage book. So what I did was while the paper was wet, I opened and closed the book a few times to give it the distressed look. I really like the old aged and worn look.
Here's another close up and a scalloped circle tag. I wrapped embroidery thread in silver around the page a few times.
A few buttons of course. and more aging
And more aging...
Greenery, and a layered embellie...
Side view of the album, being "free"
I hope you enjoyed looking at my photos and found a little bit of inspiration or an idea :)
Emily XOXO
(Album can be found here at SweetlyScrapped)


